Announcement

Collapse
No announcement yet.

help with motherboard unbrick technique GA-EX38-DS4

Collapse
X
 
  • Filter
  • Time
  • Show
Clear All
new posts

  • help with motherboard unbrick technique GA-EX38-DS4

    my rather boring and unfortunate story begins on page 261, post #2606


    from what i understand there may be a method that, although not without significant risk, might save my motherboard. eager to assess the situation and figure out exactly what i'm gonna be doing here. :)

  • #2
    Re: help with motherboard unbrick technique GA-EX38-DS4

    First of all, when you flashed your motherboard with the modded beta bios, what cpu and memory settings were your using? Overclocked? Standard settings?

    The thread that you need to read and understand is http://forums.tweaktown.com/gigabyte...ng-failed.html

    There are several techniques in the thread and some suggestions to try booting by keeping the front case on/off switch depressed for a length of time. If you don't have a floppy drive, you might be able to use a bootable FAT32 usb flash drive with the extracted bios file in the root directory. More details on this approach later.

    The last resort that might work is to jumper two pins on the MAIN BIOS chip.
    If you make a mistake and the jumper wire accidentally makes contact with a nearby bios pin connector, there is a good chance that this short circuit will let all the magic smoke out your motherboard and it will be permanently damaged.

    Read the thread and post any questions that you have.
    The bios chip layout on your EX38-DS4 motherboard is even more difficult to work with than other Gigabyte dual bios chip motherboards.

    Enclosed is a picture with some of the bios chip pins labeled. The #1 pin is usually closest to the colored dot on the top of the bios chip, but sometimes this dot is in a confusing position. You will probably also see a small triangle symbol on the motherboard closest to the #1 pin.

    Click image for larger version

Name:	EX38-DS4 Bios Chips [labels].jpg
Views:	1
Size:	102.4 KB
ID:	753981


    X58A-OC detailed bios chip layout:
    Q9650 @ 4.10GHz [9x456MHz]
    P35-DS4 [rev: 2.0] ~ Bios: F14
    4x2GB OCZ Reaper PC2-8500 1094MHz @5-5-5-15
    MSI N460GTX Hawk Talon Attack (1GB) video card <---- SLI ---->
    Seasonic SS-660XP2 80 Plus Platinum psu (660w)
    WD Caviar Black WD6401AALS 640GB (data)
    Samsung 840 Pro 256GB SSD (boot)
    SLI @ 16/4 works when running HyperSLI
    Cooler Master 120XL Seidon push/pull AIO cpu water cooling
    Cooler Master HAF XB computer case (RC-902XB-KKN1)
    Asus VH242H 24" monitor [1920x1080]
    MSI N460GTX Hawk (1GB) video card
    Logitech Z-5500 Digital 5.1 Speakers
    win7 x64 sp1 Home Premium
    HT|Omega Claro plus+ sound card
    CyberPower CP1500PFCLCD UPS
    E6300 (R0) @ 3.504GHz [8x438MHz] ~~ P35-DS3L [rev: 1.0] ~ Bios: F9 ~~ 4x2GB Kingston HyperX T1 PC2-8500, 876MHz @4-4-4-10
    Seasonic X650 80+ gold psu (650w) ~~ Xigmatek Balder HDT 1283 cpu cooler ~~ Cooler Master CM 690 case (RC-690-KKN1-GP)
    Samsung 830 128GB SSD MZ-7PC128B/WW (boot) ~~ WD Caviar Black WD6401AALS 640GB (data) ~~ ZM-MFC2 fan controller
    HT|Omega Striker 7.1 sound card ~~ Asus VH242H monitor [1920x1080] ~~ Logitech Z-5500 Digital 5.1 Speakers
    win7 x64 sp1 Home Premium ~~ CyberPower CP1500PFCLCD U.P.S
    .

    Comment


    • #3
      Re: help with motherboard unbrick technique GA-EX38-DS4

      well i have armed myself and attemped both four and seven, as well as six and five. nothing has worked yet, but i'm probably doing it wrong. back to the drawing board. good news, no magic smoke!

      Comment


      • #4
        Re: help with motherboard unbrick technique GA-EX38-DS4
        • Make sure that you're jumpering the MAIN bios chip and not the BACKUP bios chip.
        • You really should install a case speaker to the front panel header pins in case the bios is trying to beep you a message.
        • Before you tried the unbrick trick, what was the amount of time for each boot loop cycle? 2 seconds on + 2 seconds off? Longer on/off intervals?
        • How many boot loops did you let your motherboard complete each time? 5 loops? 10 loops? 20 loops?
        • How many memory modules are currently installed? 1? 2? 3? 4?
          Which memory slot names are you using?
        • I suggest that you disconnect all devices that are NOT required for booting into the bios, such as all usb devices, mouse, all drives, network cable, all pci-e devices (except your monitor), etc.
        • Disconnect the front panel's RESET switch as this can cause boot failures.
        • Also disconnect the front panel's usb cable that connects to the motherboard.
        • Is your motherboard still installed in the computer case? Is the mobo sitting on a cardboard box beside the cpu case?

        Maybe your power supply had a "coincidental" failure, can you test with a different, very good quality psu?
        You might need to test with a different video card, video cable and/or monitor.
        Are all cables, wires and hardware securely connected?

        If you reread the thread that I linked to, you'll see several posts where it took quite a few attempts to get the timing just right with jumpering the connectors and removing the jumper. What are the details for EXACTLY how you are jumpering the pins and powering on your system.

        Are details important? Naw it'll just take a whole lot longer to solve the problem when we don't know everything about your system.

        We need detailed information about ALL OF THE HARDWARE in your system.

        We can best help you after you create a detailed hardware list in the System Specs portion of your
        forum profile http://forums.tweaktown.com/profile.php?do=editprofile at the bottom of the
        profile page or in your forum signature http://forums.tweaktown.com/profile....=editsignature.
        Be sure to include brand names and model numbers.

        Look at my specs and you'll see that there is very little information that isn't included.
        Last edited by profJim; 11-01-2013, 05:12 AM. Reason: spelling
        Q9650 @ 4.10GHz [9x456MHz]
        P35-DS4 [rev: 2.0] ~ Bios: F14
        4x2GB OCZ Reaper PC2-8500 1094MHz @5-5-5-15
        MSI N460GTX Hawk Talon Attack (1GB) video card <---- SLI ---->
        Seasonic SS-660XP2 80 Plus Platinum psu (660w)
        WD Caviar Black WD6401AALS 640GB (data)
        Samsung 840 Pro 256GB SSD (boot)
        SLI @ 16/4 works when running HyperSLI
        Cooler Master 120XL Seidon push/pull AIO cpu water cooling
        Cooler Master HAF XB computer case (RC-902XB-KKN1)
        Asus VH242H 24" monitor [1920x1080]
        MSI N460GTX Hawk (1GB) video card
        Logitech Z-5500 Digital 5.1 Speakers
        win7 x64 sp1 Home Premium
        HT|Omega Claro plus+ sound card
        CyberPower CP1500PFCLCD UPS
        E6300 (R0) @ 3.504GHz [8x438MHz] ~~ P35-DS3L [rev: 1.0] ~ Bios: F9 ~~ 4x2GB Kingston HyperX T1 PC2-8500, 876MHz @4-4-4-10
        Seasonic X650 80+ gold psu (650w) ~~ Xigmatek Balder HDT 1283 cpu cooler ~~ Cooler Master CM 690 case (RC-690-KKN1-GP)
        Samsung 830 128GB SSD MZ-7PC128B/WW (boot) ~~ WD Caviar Black WD6401AALS 640GB (data) ~~ ZM-MFC2 fan controller
        HT|Omega Striker 7.1 sound card ~~ Asus VH242H monitor [1920x1080] ~~ Logitech Z-5500 Digital 5.1 Speakers
        win7 x64 sp1 Home Premium ~~ CyberPower CP1500PFCLCD U.P.S
        .

        Comment


        • #5
          Re: help with motherboard unbrick technique GA-EX38-DS4

          Originally posted by profJim View Post
          • Make sure that you're jumpering the MAIN bios chip and not the BACKUP bios chip.
          Definitely on the right chip, but I'm not entirely sure I'm jumpering correctly. Just need to have a conductive connection between the two terminals, right?
          Originally posted by profJim
          • You really should install a case speaker to the front panel header pins in case the bios is trying to beep you a message.
          I agree, but with almost all of my variables eliminated (booting with no peripheral devices, one DIMM in slot 4, etc.) I don't think the POST codes are going to tell me anything I don't already know. Plus they didn't have one at radioshack. :) I do plan on scavenging one eventually, but I'm not going to consider it a critical component that I should postpone my troubleshooting for lacking.
          Originally posted by profJim
          • Before you tried the unbrick trick, what was the amount of time for each boot loop cycle? 2 seconds on + 2 seconds off? Longer on/off intervals?
          That is approximately correct. Sometimes initial boot would last 4-5 seconds, then back to roughly proportional on/off cycles.
          Originally posted by profJim
          • How many boot loops did you let your motherboard complete each time? 5 loops? 10 loops? 20 loops?
          • How many memory modules are currently installed? 1? 2? 3? 4?
            Which memory slot names are you using?
          • I suggest that you disconnect all devices that are NOT required for booting into the bios, such as all usb devices, mouse, all drives, network cable, all pci-e devices (except your monitor), etc.
          • Disconnect the front panel's RESET switch as this can cause boot failures.
          • Also disconnect the front panel's usb cable that connects to the motherboard.
          I hadn't considered the USB and RESET headers, I will disco those and consider that variable eliminated. Not more than 20. Everything non-essential is disconnected. Including the battery, although I'm not sure whether the battery should be in or out.
          Originally posted by profJim
          • Is your motherboard still installed in the computer case? Is the mobo sitting on a cardboard box beside the cpu case?
          It remains installed in a case.
          Originally posted by profJim
          Maybe your power supply had a "coincidental" failure, can you test with a different, very good quality psu?
          I get the same results with both the Antec HE550 assigned to this rig, and the Cooler Master V1000 I run in my new rig.
          Originally posted by profJim
          You might need to test with a different video card, video cable and/or monitor.
          I've tried a couple cards that are verified working, in both PEG slots, HD3870, and a second HD6870. I could also try with one of my HD7950s, but I don't see the necessity. I've got three different displays at this workstation and a variety of cables and connection types to use, should be good there. Currently using a confirmed HDMI out to DVI in as primary while troubleshooting.
          Originally posted by profJim
          Are all cables, wires and hardware securely connected?
          Absolutely.
          Originally posted by profJim
          If you reread the thread that I linked to, you'll see several posts where it took quite a few attempts to get the timing just right with jumpering the connectors and removing the jumper. What are the details for EXACTLY how you are jumpering the pins and powering on your system.
          This is the variable I think I need to focus on. I really have no idea what the "right" or "best" way to do this would be. Terminals 4 and 7? 5 and 6? So far I have been very limited and conservative, only trying to boot with each pair already jumpered, rebooting 3-5 times, holding power button, etc. I also tried very briefly jumpering 4 and 7 during the first few moments after powering on by applying micro alligator clips to each terminal and then laying a jumper wire wire across the top of the clips while powering on, not as comfortable as I'd like with that though. Therefore I haven't yet comprehensively experimented with trying to apply the jumpers at different times during/after boot, mainly because I'm apprehensive about applying jumpers while the board is powered on. I think I may set up leads connected my terminals, and then I can jumper the ends of the leads on my desk safely and remotely from the board.
          Originally posted by profJim
          Are details important? Naw it'll just take a whole lot longer to solve the problem when we don't know everything about your system.

          We need detailed information about ALL OF THE HARDWARE in your system.

          We can best help you after you create a detailed hardware list in the System Specs portion of your
          forum profile http://forums.tweaktown.com/profile.php?do=editprofile at the bottom of the
          profile page or in your forum signature http://forums.tweaktown.com/profile....=editsignature.
          Be sure to include brand names and model numbers.

          Look at my specs and you'll see that there is very little information that isn't included.
          Updated, although I only included what is currently connected for troubleshooting. I will make a comprehensive profile signature for both of my current rigs at a later date.

          Thanks for the in depth attention to detail! It may just be a matter of trial and error regarding how I proceed with the jumpering, I'm going to try and find more resources, maybe a video of the process from start to completion. I don't like what I currently know; the process seems completely random and may take hours to successfully accomplish without knowing specifically how or EXACTLY why it works. hahaha /cry

          Comment


          • #6
            Re: help with motherboard unbrick technique GA-EX38-DS4

            just can't seem to get it, trying various timings during boot cycles, trying 5 + 6 and 4 + 7. i feel like it's reading the back up BIOS based on the rhythm of the boot cycles (i've experienced booting from the backup bios several times before) but the backup BIOS must have the same issue as the main BIOS. AFAIK it's not like the backup BIOS is some kind of pristine never modified stock BIOS. I thought that when you flashed the BIOS you overwrote BOTH the main and backup, thus flashing a BIOS that won't allow your system to POST is essentially bricking it, no matter whether you can successfully use the backup BIOS or not. Can somebody please help me to verify or discredit this? The main reason I'm going on this is because when I've booted from back up BIOS before, even though all the defaults were in place, the BIOS revision was always the same, and I've updated the BIOS three times. If the backup BIOS were truly that, how does it make sense the the backup BIOS revision is always concurrent with my main BIOS revision on the occasions when I have observed the system booting from backup BIOS?

            Comment


            • #7
              Re: help with motherboard unbrick technique GA-EX38-DS4

              How or why this technique works?

              From post #1 in the dead dual bios thread:
              According to the datasheet it is possible to prohibit reading from and writing to the chip by connecting pins 4 (GND) and 7 (#HOLD). The trick I was going to play was to disable the main chip and re-enabling it as soon as the backup BIOS loaded.
              From post #2:
              You may also just manually short pins 5-6 on the MAIN BIOS, this way no solder is needed
              From post #3:
              I assume that your method relies on SI being in low state thus overriding the SCLK, hmmm..., interesting idea. However setting #HOLD to low is more "accurate" ;-).
              note: the BIOS CHIP mx25l8005 link still works if you want to download the BIOS CHIP mx25l8005.pdf file.

              The technique in post #5 is confusing because the author uses different terms from those found in post #2.

              Reread post #10 and try the 7 step approach.

              Have you tried the approach in post #28?
              It is possible to make the BIOS Auto-Recovery kick in (Dual BIOS) and re-flash the MAIN BIOS with the contents of the BACKUP BIOS.

              This is a simple and easy method for anyone to try before having to resort to other more difficult methods, or a RMA.
              1. Shut off the power supply using the switch on the back of the PSU, wait 10-15 seconds.
              2. Press and hold the case Power On swtich, then while still holding turn on the power supply from the switch on the rear.
              3. Still holding the case power on switch, the board will start, once it does release the case power on switch and shut off the power supply via the switch on the read of the unit. (Do the latter two parts as quickly as you can once the board starts)
              4. The board will shut down.
              5. Turn the power supply back on using the switch on the rear of the unit.
              6. Turn on the motherboard by pressing the case power on button.

              Once the board starts this time you should see the Gigabyte splash screen, or POST page, then the Auto-Recovery from Dual BIOS will kick in. You will see a checksum error, and then recovery from BACKUP BIOS will begin. Once it is done reboot your machine and enter the BIOS and load optimized defaults then save/apply/reboot back to BIOS.

              Now you are done, and will be using whatever BIOS was in your BACKUP BIOS, From there you can attempt whatever you were previously trying, or update your BIOS to the latest version.
              the above quote is from from http://forums.tweaktown.com/gigabyte...tml#post258596, post #2

              In post #33, the member had success using this technique:
              I took a paper clip, connected pins 4 and 7 with a steady hand ;) and had my wife plug in the computer and switch it on. And voila, the GigaByte logo showed up, so it worked like charm, and took me about 10 minutes, after searching the web for about 2 hours to come to this thread :)
              In post #34, our former fearless leader destroyed his motherboard when he accidentally shorted pins 4 + 8.

              It's clear that there isn't one technique that is foolproof.

              I'd like to know how you knew that you had previously booted successfully using the backup bios.
              It's my understanding that the backup bios is never automatically copied from the main bios chip. Some newer models have the ability to copy the main bios chip to the backup bios chip, but I don't know if these newer models can also copy the backup bios chip to the main bios chip.

              ***EDIT***
              I've never heard of booting with the motherboard's battery removed.
              Make sure that the battery's voltage is at least 3.0 volts and install a new motherboard battery if there is any doubt.
              Last edited by profJim; 11-03-2013, 05:51 AM.
              Q9650 @ 4.10GHz [9x456MHz]
              P35-DS4 [rev: 2.0] ~ Bios: F14
              4x2GB OCZ Reaper PC2-8500 1094MHz @5-5-5-15
              MSI N460GTX Hawk Talon Attack (1GB) video card <---- SLI ---->
              Seasonic SS-660XP2 80 Plus Platinum psu (660w)
              WD Caviar Black WD6401AALS 640GB (data)
              Samsung 840 Pro 256GB SSD (boot)
              SLI @ 16/4 works when running HyperSLI
              Cooler Master 120XL Seidon push/pull AIO cpu water cooling
              Cooler Master HAF XB computer case (RC-902XB-KKN1)
              Asus VH242H 24" monitor [1920x1080]
              MSI N460GTX Hawk (1GB) video card
              Logitech Z-5500 Digital 5.1 Speakers
              win7 x64 sp1 Home Premium
              HT|Omega Claro plus+ sound card
              CyberPower CP1500PFCLCD UPS
              E6300 (R0) @ 3.504GHz [8x438MHz] ~~ P35-DS3L [rev: 1.0] ~ Bios: F9 ~~ 4x2GB Kingston HyperX T1 PC2-8500, 876MHz @4-4-4-10
              Seasonic X650 80+ gold psu (650w) ~~ Xigmatek Balder HDT 1283 cpu cooler ~~ Cooler Master CM 690 case (RC-690-KKN1-GP)
              Samsung 830 128GB SSD MZ-7PC128B/WW (boot) ~~ WD Caviar Black WD6401AALS 640GB (data) ~~ ZM-MFC2 fan controller
              HT|Omega Striker 7.1 sound card ~~ Asus VH242H monitor [1920x1080] ~~ Logitech Z-5500 Digital 5.1 Speakers
              win7 x64 sp1 Home Premium ~~ CyberPower CP1500PFCLCD U.P.S
              .

              Comment


              • #8
                Re: help with motherboard unbrick technique GA-EX38-DS4

                Originally posted by profJim View Post
                How or why this technique works?

                From post #1 in the dead dual bios thread:
                From post #2:
                From post #3:note: the BIOS CHIP mx25l8005 link still works if you want to download the BIOS CHIP mx25l8005.pdf file.

                The technique in post #5 is confusing because the author uses different terms from those found in post #2.

                Reread post #10 and try the 7 step approach.

                Have you tried the approach in post #28? the above quote is from from http://forums.tweaktown.com/gigabyte...tml#post258596, post #2

                In post #33, the member had success using this technique:

                In post #34, our former fearless leader destroyed his motherboard when he accidentally shorted pins 4 + 8.

                It's clear that there isn't one technique that is foolproof.

                I'd like to know how you knew that you had previously booted successfully using the backup bios.
                It's my understanding that the backup bios is never automatically copied from the main bios chip. Some newer models have the ability to copy the main bios chip to the backup bios chip, but I don't know if these newer models can also copy the backup bios chip to the main bios chip.

                ***EDIT***
                I've never heard of booting with the motherboard's battery removed.
                Make sure that the battery's voltage is at least 3.0 volts and install a new motherboard battery if there is any doubt.
                haha prof, you just summed up all of the key points among the various threads i've read and that have been rolling around in my mind lately. i've attempted all of it, the only thing i can do now is either keep trying until it just miraculously works, or find an alternative solution.

                regarding booting from backup bios, i very well may be mistaken, but upon a failure to boot, especially when POST is interrupted, the system will revert back to "optimized defaults" and i'll notice it boots with stock clocks, etc. - i assumed this was the backup bios booting. this would often happen when i used the reset button on my old case. hmm... old case... maybe it's worth hauling out of the garage for a try with the rest button. sounds crazy to me. but then again, i'm feeling crazy.

                i just bought a replacement bios chip on ebay and am likely going to have it soldered in by my local tv repair guy. but then do i solder it onto main bios, or backup bios? if backup bios is bad, am i risking hosing the bios on the new chip if i solder into the main bios spot? am i even sure that the backup bios is bad?! where is the emoticon of the dude bashing his head into a brick wall... or crying into an empty bottle of gin?

                battery went back in for my last round of jumpering. i read the pdf when i did my initial research, the erase and programming performance section on page thirty-four were useful, but otherwise i wasn't sure what to make out of most of it.

                Comment


                • #9
                  Re: help with motherboard unbrick technique GA-EX38-DS4

                  regarding booting from backup bios, i very well may be mistaken, but upon a failure to boot, especially when POST is interrupted, the system will revert back to "optimized defaults" and i'll notice it boots with stock clocks, etc. - i assumed this was the backup bios booting. this would often happen when i used the reset button on my old case. hmm... old case... maybe it's worth hauling out of the garage for a try with the rest button. sounds crazy to me. but then again, i'm feeling crazy.
                  _ WRONG, oh misguided one.
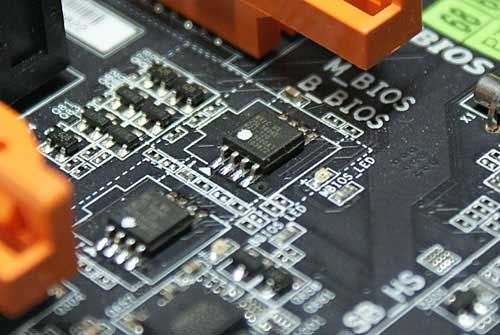
                  It's SOP (standard operating procedure) for the bios to reset to default settings, and I'm pretty sure that "Fail Safe" defaults are used when the bios reset occurs, not the Optimized default settings. This is exactly what happens with my single bios chip P35-DS3L system when the bios barfs on my overclocked settings. Before my EP45-UD3P died (it wouldn't power up), my bios would reset to non-optimized bios defaults. My GA-N650-DS4 bios had options where I could choose which bios I wanted to boot from, and there was an option to copy the Main or Backup bios to the other bios chip. It's too bad my replacement N650-DS4 turned out to be a real turd when it came to overclocking.

                  My best SWAG, your backup bios chip is probably OK and the main bios chip probably is "getting in the way". If the boot-block portion of the main bios is trashed, I don't think that there is any way for the unbricking technique to work.

                  With serious or very difficult problems, I always diagnose a system outside of the computer case where the motherboard is placed on a cardboard box beside the case. Never put an anti-static bag under the motherboard when testing this way, as the bag is electrically conductive on its surface.

                  It's possible that your motherboard is trying to send you a beep message that might be helpful in pointing out where the problem is.
                  Q9650 @ 4.10GHz [9x456MHz]
                  P35-DS4 [rev: 2.0] ~ Bios: F14
                  4x2GB OCZ Reaper PC2-8500 1094MHz @5-5-5-15
                  MSI N460GTX Hawk Talon Attack (1GB) video card <---- SLI ---->
                  Seasonic SS-660XP2 80 Plus Platinum psu (660w)
                  WD Caviar Black WD6401AALS 640GB (data)
                  Samsung 840 Pro 256GB SSD (boot)
                  SLI @ 16/4 works when running HyperSLI
                  Cooler Master 120XL Seidon push/pull AIO cpu water cooling
                  Cooler Master HAF XB computer case (RC-902XB-KKN1)
                  Asus VH242H 24" monitor [1920x1080]
                  MSI N460GTX Hawk (1GB) video card
                  Logitech Z-5500 Digital 5.1 Speakers
                  win7 x64 sp1 Home Premium
                  HT|Omega Claro plus+ sound card
                  CyberPower CP1500PFCLCD UPS
                  E6300 (R0) @ 3.504GHz [8x438MHz] ~~ P35-DS3L [rev: 1.0] ~ Bios: F9 ~~ 4x2GB Kingston HyperX T1 PC2-8500, 876MHz @4-4-4-10
                  Seasonic X650 80+ gold psu (650w) ~~ Xigmatek Balder HDT 1283 cpu cooler ~~ Cooler Master CM 690 case (RC-690-KKN1-GP)
                  Samsung 830 128GB SSD MZ-7PC128B/WW (boot) ~~ WD Caviar Black WD6401AALS 640GB (data) ~~ ZM-MFC2 fan controller
                  HT|Omega Striker 7.1 sound card ~~ Asus VH242H monitor [1920x1080] ~~ Logitech Z-5500 Digital 5.1 Speakers
                  win7 x64 sp1 Home Premium ~~ CyberPower CP1500PFCLCD U.P.S
                  .

                  Comment


                  • #10
                    Re: help with motherboard unbrick technique GA-EX38-DS4

                    well that is somewhat encouraging...

                    i suppose it"s time to rig up a pc speaker from ... the remains of a busted lcd tv? closest thing in sight.

                    i normally would bench it, but it just went into this 330R the week before last, carefully and painstakingly, a very nice build in a case that leaves little room for chassis related problems, i'm confident that after two weeks of stability until i flashed the bios, the case isn't a likely culprit. of course, this wouldn't be the first, and definitely not the last time i'm wrong.

                    Comment


                    • #11
                      Re: help with motherboard unbrick technique GA-EX38-DS4

                      Making assumptions and taking shortcuts is not the best course to follow. Of course we need to use common sense, but when the going gets rough, it's time to look at every possibility and get down to basics. I've seen some of the most unlikely, crazy things cause system problems and in many instances, the problem wasn't found until the motherboard was removed from the case and tested with a minimal hardware setup. It's possible that a loose screw in your case is causing a partial short circuit. Is this likely? Probably not, but maybe you will find a wire or an usused psu cable end that is causing a problem. In my years of repairing many things, I've developed a hostility to random "coincidental" failures. One time a customer blamed me when his motorcycle headlight failed shortly after I replaced his rear tire.

                      One time I fixed a faulty case speaker by splicing and soldering a tiny 8 ohm speaker in place of the original case speaker. It was the best and loudest case speaker I ever used.

                      If needed, having a pro replace your main bios chip sounds like it will probably fix your problem.

                      I don't think that you answered one of my original questions; when you originally flashed the modded bios, were you using optimized stock bios settings, that is with no overclock? I'm using 4 x 2GB memory modules in each of my systems. When I'm going to flash my bios, I unplug my power supply from the wall outlet, press and hold the front panel on/off power switch for 10+ sececonds, and then I remove all but one of the memory modules. When I'm ready to use QFlash, I power up my system, go into the bios, load optimized bios defaults, and then make several minor bios changes, such as Disable the Full Screen logo. Now I'm ready to flash the bios.
                      Q9650 @ 4.10GHz [9x456MHz]
                      P35-DS4 [rev: 2.0] ~ Bios: F14
                      4x2GB OCZ Reaper PC2-8500 1094MHz @5-5-5-15
                      MSI N460GTX Hawk Talon Attack (1GB) video card <---- SLI ---->
                      Seasonic SS-660XP2 80 Plus Platinum psu (660w)
                      WD Caviar Black WD6401AALS 640GB (data)
                      Samsung 840 Pro 256GB SSD (boot)
                      SLI @ 16/4 works when running HyperSLI
                      Cooler Master 120XL Seidon push/pull AIO cpu water cooling
                      Cooler Master HAF XB computer case (RC-902XB-KKN1)
                      Asus VH242H 24" monitor [1920x1080]
                      MSI N460GTX Hawk (1GB) video card
                      Logitech Z-5500 Digital 5.1 Speakers
                      win7 x64 sp1 Home Premium
                      HT|Omega Claro plus+ sound card
                      CyberPower CP1500PFCLCD UPS
                      E6300 (R0) @ 3.504GHz [8x438MHz] ~~ P35-DS3L [rev: 1.0] ~ Bios: F9 ~~ 4x2GB Kingston HyperX T1 PC2-8500, 876MHz @4-4-4-10
                      Seasonic X650 80+ gold psu (650w) ~~ Xigmatek Balder HDT 1283 cpu cooler ~~ Cooler Master CM 690 case (RC-690-KKN1-GP)
                      Samsung 830 128GB SSD MZ-7PC128B/WW (boot) ~~ WD Caviar Black WD6401AALS 640GB (data) ~~ ZM-MFC2 fan controller
                      HT|Omega Striker 7.1 sound card ~~ Asus VH242H monitor [1920x1080] ~~ Logitech Z-5500 Digital 5.1 Speakers
                      win7 x64 sp1 Home Premium ~~ CyberPower CP1500PFCLCD U.P.S
                      .

                      Comment


                      • #12
                        Re: help with motherboard unbrick technique GA-EX38-DS4

                        I had the same issue with my EP45-DS4 after flashing with modified bios. I didn't look into your bios but I think sensitive modules where moved and your MB will not boot nor even POST. After many days of trying to boot from the backup bios I found one solution. You must press and hold the reset button then power up the mobo. It will start and after 4-5 sec shut down. When starting again you should hear a beep and a backup bios should start. If you want to modify your bios you should read thread [Guide] Enhanced BIOS Modding of Award BIOSes

                        Comment


                        • #13
                          Re: help with motherboard unbrick technique GA-EX38-DS4

                          @zslawek
                          Thanks for posting your procdure.

                          To use your procedure, at what time did you release the front panel's RESET button?
                          After the mobo shuts down?
                          Shortly after the mobo first starts up?

                          When you first power up your system, did you use the front panel's on/off power switch? PSU on/off switch?

                          The EX38-DS4 uses the ICH9R chipset. I don't know if raid roms for ICH9R and ICH10R are the same.

                          If the OP's bios boot-block is too badly damaged, I don't know if your procedure will work.
                          It's worth a try as he has nothing too lose at this point.
                          Q9650 @ 4.10GHz [9x456MHz]
                          P35-DS4 [rev: 2.0] ~ Bios: F14
                          4x2GB OCZ Reaper PC2-8500 1094MHz @5-5-5-15
                          MSI N460GTX Hawk Talon Attack (1GB) video card <---- SLI ---->
                          Seasonic SS-660XP2 80 Plus Platinum psu (660w)
                          WD Caviar Black WD6401AALS 640GB (data)
                          Samsung 840 Pro 256GB SSD (boot)
                          SLI @ 16/4 works when running HyperSLI
                          Cooler Master 120XL Seidon push/pull AIO cpu water cooling
                          Cooler Master HAF XB computer case (RC-902XB-KKN1)
                          Asus VH242H 24" monitor [1920x1080]
                          MSI N460GTX Hawk (1GB) video card
                          Logitech Z-5500 Digital 5.1 Speakers
                          win7 x64 sp1 Home Premium
                          HT|Omega Claro plus+ sound card
                          CyberPower CP1500PFCLCD UPS
                          E6300 (R0) @ 3.504GHz [8x438MHz] ~~ P35-DS3L [rev: 1.0] ~ Bios: F9 ~~ 4x2GB Kingston HyperX T1 PC2-8500, 876MHz @4-4-4-10
                          Seasonic X650 80+ gold psu (650w) ~~ Xigmatek Balder HDT 1283 cpu cooler ~~ Cooler Master CM 690 case (RC-690-KKN1-GP)
                          Samsung 830 128GB SSD MZ-7PC128B/WW (boot) ~~ WD Caviar Black WD6401AALS 640GB (data) ~~ ZM-MFC2 fan controller
                          HT|Omega Striker 7.1 sound card ~~ Asus VH242H monitor [1920x1080] ~~ Logitech Z-5500 Digital 5.1 Speakers
                          win7 x64 sp1 Home Premium ~~ CyberPower CP1500PFCLCD U.P.S
                          .

                          Comment


                          • #14
                            Re: help with motherboard unbrick technique GA-EX38-DS4

                            Originally posted by profJim View Post
                            To use your procedure, at what time did you release the front panel's RESET button?
                            After the mobo shuts down?
                            Shortly after the mobo first starts up?
                            After the mobo shuts down
                            Originally posted by profJim View Post
                            When you first power up your system, did you use the front panel's on/off power switch? PSU on/off switch?
                            the front panel's on/off power switch

                            Comment


                            • #15
                              Re: help with motherboard unbrick technique GA-EX38-DS4

                              Thanks for explaining the details.
                              Q9650 @ 4.10GHz [9x456MHz]
                              P35-DS4 [rev: 2.0] ~ Bios: F14
                              4x2GB OCZ Reaper PC2-8500 1094MHz @5-5-5-15
                              MSI N460GTX Hawk Talon Attack (1GB) video card <---- SLI ---->
                              Seasonic SS-660XP2 80 Plus Platinum psu (660w)
                              WD Caviar Black WD6401AALS 640GB (data)
                              Samsung 840 Pro 256GB SSD (boot)
                              SLI @ 16/4 works when running HyperSLI
                              Cooler Master 120XL Seidon push/pull AIO cpu water cooling
                              Cooler Master HAF XB computer case (RC-902XB-KKN1)
                              Asus VH242H 24" monitor [1920x1080]
                              MSI N460GTX Hawk (1GB) video card
                              Logitech Z-5500 Digital 5.1 Speakers
                              win7 x64 sp1 Home Premium
                              HT|Omega Claro plus+ sound card
                              CyberPower CP1500PFCLCD UPS
                              E6300 (R0) @ 3.504GHz [8x438MHz] ~~ P35-DS3L [rev: 1.0] ~ Bios: F9 ~~ 4x2GB Kingston HyperX T1 PC2-8500, 876MHz @4-4-4-10
                              Seasonic X650 80+ gold psu (650w) ~~ Xigmatek Balder HDT 1283 cpu cooler ~~ Cooler Master CM 690 case (RC-690-KKN1-GP)
                              Samsung 830 128GB SSD MZ-7PC128B/WW (boot) ~~ WD Caviar Black WD6401AALS 640GB (data) ~~ ZM-MFC2 fan controller
                              HT|Omega Striker 7.1 sound card ~~ Asus VH242H monitor [1920x1080] ~~ Logitech Z-5500 Digital 5.1 Speakers
                              win7 x64 sp1 Home Premium ~~ CyberPower CP1500PFCLCD U.P.S
                              .

                              Comment

                              Working...
                              X